안녕하세요~ Sooss입니다. AI스터디의 마지막시간 RNN입니다. 확실히 AI는 만만치 않네요.. 이게 첫걸음이라니 흑흑
마지막이니깐 힘내봐요~
그럼 Start~!!
Sequence data
Sequence data란? 연속적인 단어라는 뜻입니다. 우리는 주로 하나의 단어보다는 여러가지의 단어를 사용해서 말을 합니다. 그래서 RNN은 이전에 했던 말을 이해해야 다음 말을 이해할수 있도록 하는 신경망 모델입니다.
즉, 현재의 state가 다음 state에 영향을 미친다는 뜻이죠. (어..? 이거 디지털회로 시간에 봤는데?)
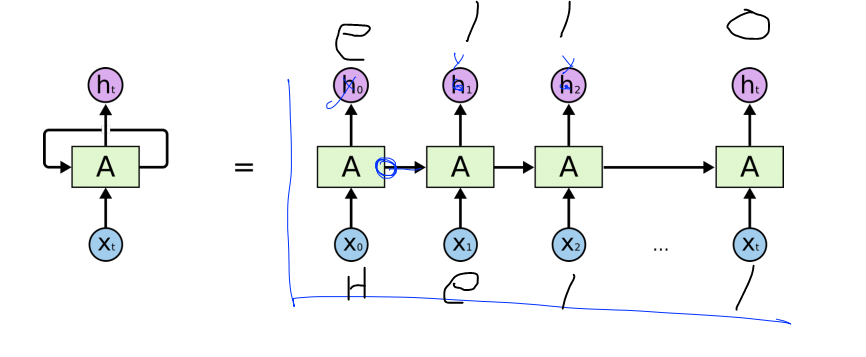
예를 들어, hell을 넣으면 ello가 나오는 그림입니다. input을 이전에했던말을 넣으면 output에는 다음 말을 예측할수 있습니다.
(Vanilla) RNN
바닐라(순수) RNN을 구현해보겠습니다.
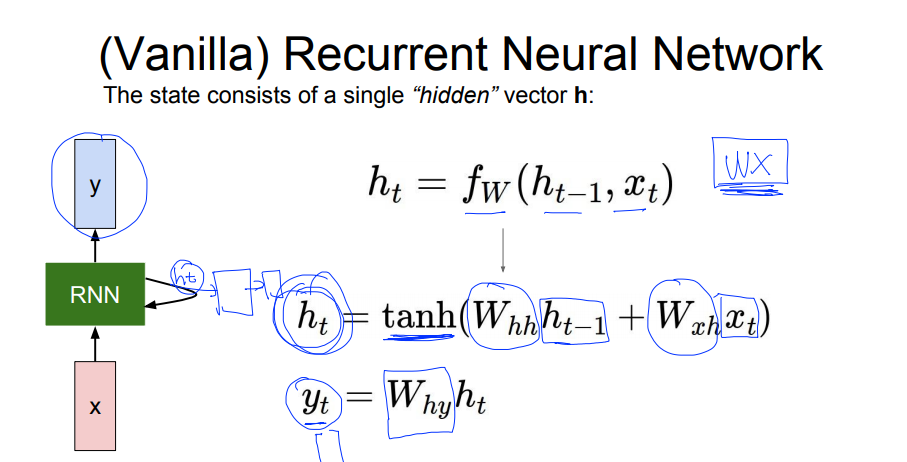
ht가 현재의 state고 yt가 그 다음 state입니다.
여기서 w의 형태가 어떻냐에따라서 yt의 값이 달라지겠죠?
자 그럼 이제 RNN은 대략 이런것이다를 파악했으니 RNN모델을 만들어볼까요?
Character-level language model
Sequence data에서 설명드린 그림 보시면 hello를 예측하는 시스템을 설명해놓았어요. 이것을 RNN을 통해 구현해보아요~
먼저 one hot encoding을 통해 vector를 표현해보아요.

각 글자에 해당하는것을 1로 표현합니다. 이것을 RNN셀에 입력해요
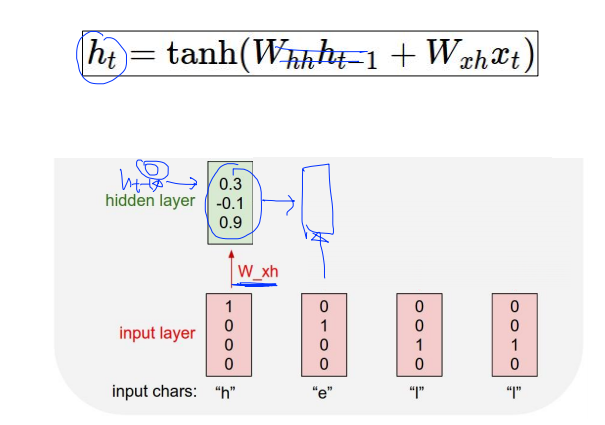
저기 hidden layer보시면 맨 처음 했을때는 h(t-1) 값이 비어있기때문에 0으로 설정하고 들어갑니다.
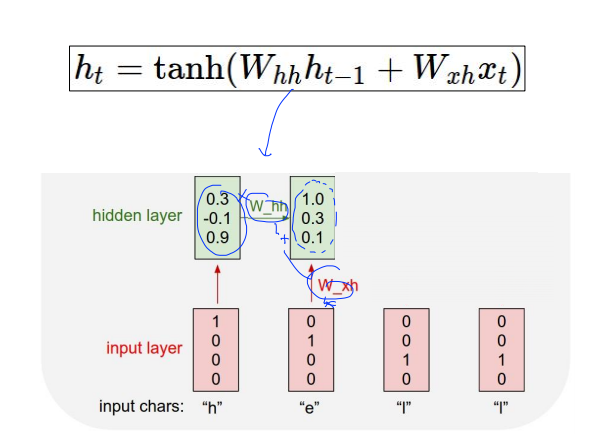
그 다음 hidden layer부터는 W_hh , W_xh 값을 더해서 다음 hidden layer를 생성해요. 이렇게 쭉쭉 갑니다.
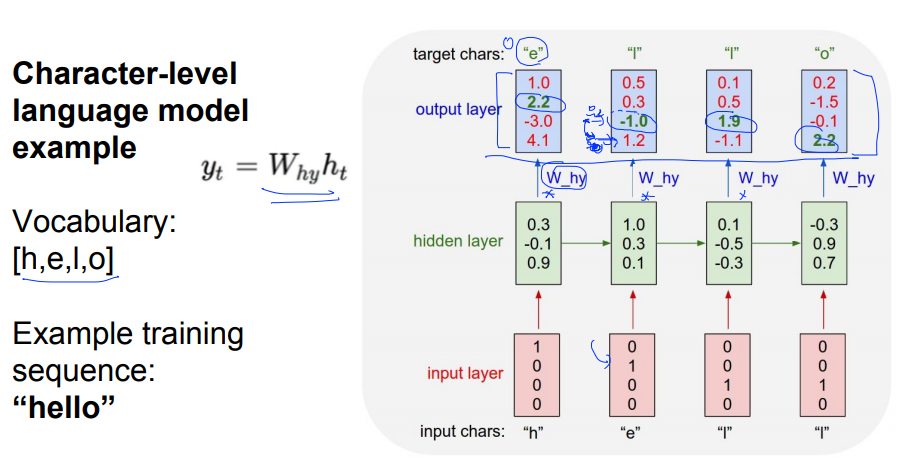
마지막 y값을 뽑아내기위해 W_hy값을 곱해서 output_layer를 생성합니다.
그 다음 softmax를 취하면 가장 큰 값을 추출해냅니다. 예를 들어, 첫번째 layer에서 가장 큰 값은 2.2이고 2.2가 있는자리는 e이므로 저 값은 e로 예측이 가능하다는 뜻이죠. 이런식으로 진행하면 됩니다.
RNN applications
RNN을 이용한 앱(App)들은 뭐가 있을까요? 한번 쭉 나열해보겠습니다.
- Language Modeling
- Speech Recognition
- Machine Translation
- Conversation Modeling/Question Answering
- Image/Video Captioning
- Image/Music/Dance Generation
와우.. 엄청 많군요? 그럼 이걸 만들때 어떻게 구성해보면 좋을까요? RNN을 활용하는 방법이 있는데 그 방법들은..
one to one, one to many, many to one, many to many가 있습니다. 각각 사용되는 부분은 다음과 같습니다.
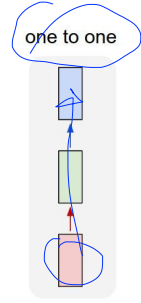
One to one은 하나의 인풋이 들어가면 하나의 아웃풋이 나오는 Vanilla Neural Networks입니다.
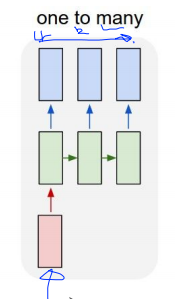
One to many는 주로 Image Captioning에 사용된다고 해요. image를 input으로 넣으면 output으로 sequence of words로 나옵니다.
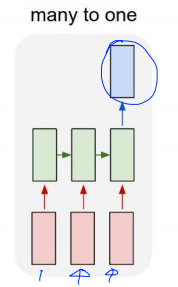
Many to one은 Sentiment Classification에 사용됩니다. 슬픈건지 화난건지 등등.. 이런걸 알 수 있다고 하네요.
sequence of words를 넣으면 sentiment가 나오는 구조입니다.
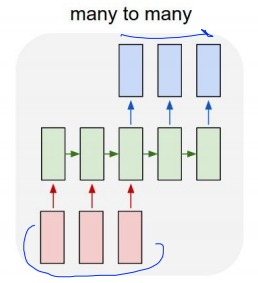
Many to many는 Machine Translation에 사용된다고 해요. (seq == sequence) seq of words를 넣으면 seq of words가 나오는 구조입니다.
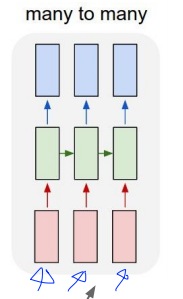
또다른 Many to many는 Video classification에 사용 된다고 해요. (프레임 레벨에서)
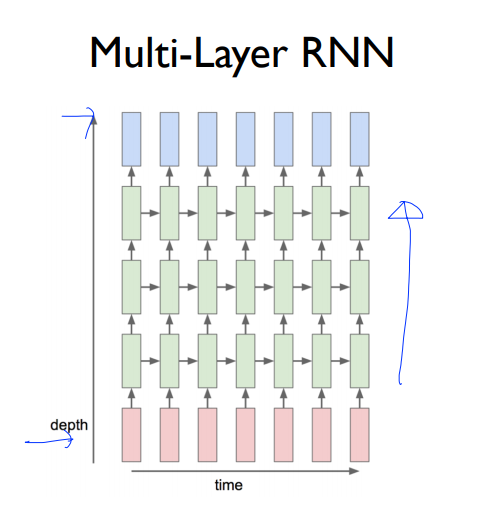
마지막으로 멀티레이어 RNN이 있어요. 이렇게하면 더 복잡한 데이터를 학습할 수 있겠죠??ㅎ
그리고 RNN같은 경우는 순수 RNN은 잘 쓰지 않고 LSTM 혹은 GRU같은 진보된 모델을 많이 쓴다고하네요.
Code
코드는 모두를 위한 딥러닝 시즌2에 모두 있습니다.
먼저 기본 RNN입니다.
import numpy as np
import tensorflow as tf
from tensorflow import keras
from tensorflow.keras import layers
from tensorflow.keras import Sequential, Model

print(tf.__version__)
필요한 라이브러리들을 임포트합니다.
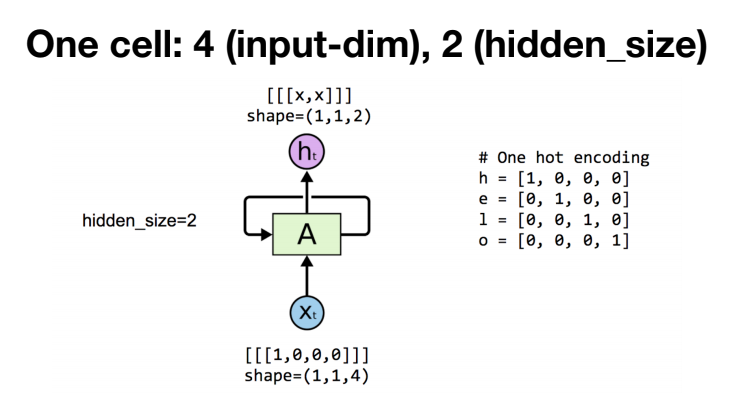
h = [1, 0, 0, 0]
e = [0, 1, 0, 0]
l = [0, 0, 1, 0]
o = [0, 0, 0, 1]
h, e, l, o를 one hot encoding합니다.
# One cell RNN input_dim (4) => output_dim (2)
x_data = np.array([[h]], dtype=np.float32)
hidden_size = 2
# creating SimpleRNNCell
cell = layers.SimpleRNNCell(units=hidden_size)
# analogous to tf.nn.dynamic_rnn
rnn = layers.RNN(cell, return_sequences=True, return_state=True)
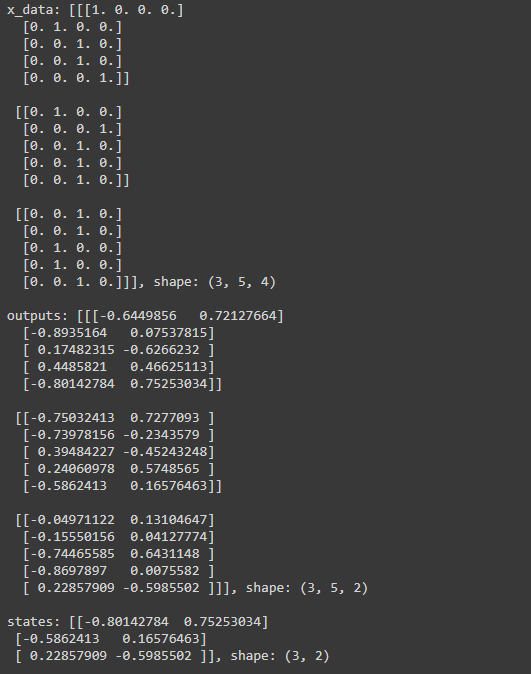
outputs, states = rnn(x_data)
print('x_data: {}, shape: {}'.format(x_data, x_data.shape))
print('outputs: {}, shape: {}'.format(outputs, outputs.shape))
print('states: {}, shape: {}'.format(states, states.shape))SimpleRNNCell , layers.RNN을 거쳐서 전처리 후, RNN이 처리한 결과를 출력하면,

이렇게 됩니다. outputs와 states의 shape가 다른 이유는 output은 전체 seq의 해당하는 hidden state값을 가지고 있고,
state는 마지막 hidden state값만 가지고 있기때문에 그렇습니다.
여기서는 h하나만 넣었기 때문에 shape가 (1,1,2)입니다. h,e,l,l,o이면 (1,5,2) 이겠죠?
sequence가 5, batch가 3인 경우를 해보면,
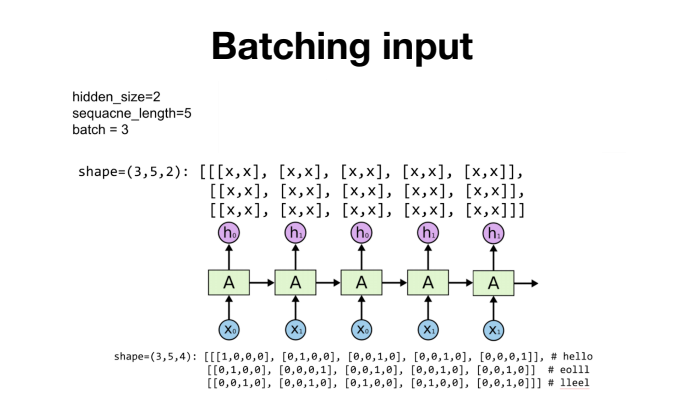
# One cell RNN input_dim (4) -> output_dim (2). sequence: 5, batch 3
# 3 batches 'hello', 'eolll', 'lleel'
x_data = np.array([[h, e, l, l, o],
                   [e, o, l, l, l],
                   [l, l, e, e, l]], dtype=np.float32)

hidden_size = 2
rnn = layers.SimpleRNN(units=2, return_sequences=True, return_state=True)
outputs, states = rnn(x_data)

print('x_data: {}, shape: {} \n'.format(x_data, x_data.shape))
print('outputs: {}, shape: {} \n'.format(outputs, outputs.shape))
print('states: {}, shape: {}'.format(states, states.shape))
이렇게 되고, 결과는..
이렇게 나오는것을 확인할 수 있습니다.
마지막으로 Many to one을 구현해보겠습니다.
many to one을 많이 쓰는 방법인 sequence classification을 알아볼께요~
'this movie is good' 을 tokenization하면 this, movie, is good으로 되고 이것을 RNN모델에 넣습니다.

맨 마지막 token인 good을 읽었을 때, Positive인지 negative인지 극성(polarity)을 판단합니다.
좀 더 깊이 들어가면,
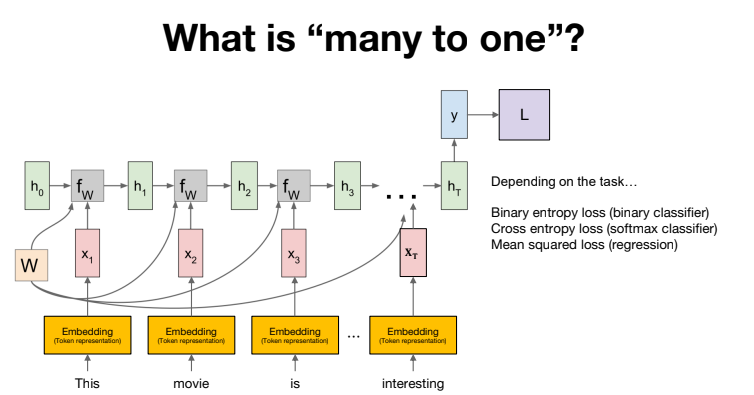
RNN은 문자를 읽을 수 없으므로 숫자로 바꿔주기 위한 Embedding layer를 삽입합니다.
마지막 토큰을 읽었을때, 출력과 정답간의 Loss를 계산할 수 있습니다. 그리고 이 Loss를 기반으로 back propagation을 통해 RNN을 학습할 수 있습니다.
그럼 이제 구현해볼까요?
import numpy as np
import tensorflow as tf
import matplotlib.pyplot as plt
from tensorflow import keras
from tensorflow.keras import layers
from tensorflow.keras import Sequential, Model
from tensorflow.keras.preprocessing.sequence import pad_sequences
%matplotlib inline

print(tf.__version__)
필요한 라이브러리들을 임포트합니다.
# example data
# 1 == 긍정, 0 == 부정
words = ['good', 'bad', 'worse', 'so good']
y_data = [1,0,0,1]

# creating a token dictionary
char_set = ['<pad>'] + sorted(list(set(''.join(words))))
idx2char = {idx : char for idx, char in enumerate(char_set)}
char2idx = {char : idx for idx, char in enumerate(char_set)}

print(char_set)
print(idx2char)
print(char2idx)
pad를 삽입하는 이유는 데이터의 sequence의 길이가 다르다면 길이를 맞춰주기 위해 하는겁니다.
결과값을 보시면,

각각의 토큰이 integer index와 mapping이 되어있는것을 확인할 수 있습니다.
# converting sequence of tokens to sequence of indices
x_data = list(map(lambda word : [char2idx.get(char) for char in word], words))
x_data_len = list(map(lambda word : len(word), x_data))

print(x_data)
print(x_data_len)
word를 integer index의 seq로 변환 가능합니다.
결과값을 보시면,

각각의 word가 integer index의 seq로 변환된것을 볼수있고,
# padding the sequence of indices
max_sequence = 10
x_data = pad_sequences(sequences=x_data, maxlen=max_sequence,
                       padding = 'post', truncating = 'post')

# checking data
print(x_data)
print(x_data_len)
print(y_data)
위 결과값을 패딩을 하면,
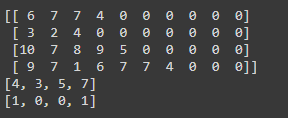
다음과 같이 0패딩이 된 것을 알 수 있습니다.
# creating simple rnn for "many to one" classification
input_dim = len(char2idx)
output_dim = len(char2idx)
one_hot = np.eye(len(char2idx))
hidden_size = 10
num_classes = 2

model = Sequential()
model.add(layers.Embedding(input_dim=input_dim, output_dim=output_dim,
                           trainable=False, mask_zero=True, input_length=max_sequence,
                           embeddings_initializer=keras.initializers.Constant(one_hot)))
model.add(layers.SimpleRNN(units=hidden_size))
model.add(layers.Dense(units=num_classes))
이제 Model을 생성해주는데요, 앞서 말씀드린 Embedding layer는 one hot encoding을 사용합니다. (이건 잘 아시죠?ㅎ)
그리고 SimpleRNN을 사용후, Dense layer가 분류를 합니다.
# creating loss function
def loss_fn(model, x, y):
    return tf.reduce_mean(tf.keras.losses.sparse_categorical_crossentropy(
        y_true=y, y_pred=model(x), from_logits=True))

# creating an optimizer
lr = .01
epochs = 30
batch_size = 2
opt = tf.keras.optimizers.Adam(learning_rate = lr)

# generating data pipeline
tr_dataset = tf.data.Dataset.from_tensor_slices((x_data, y_data))
tr_dataset = tr_dataset.shuffle(buffer_size = 4)
tr_dataset = tr_dataset.batch(batch_size = batch_size)

print(tr_dataset)
이제 모델을 학습시키기위해 loss함수를 정의합니다. (모델의 출력과 결과를 비교하는 loss함수)
# training
tr_loss_hist = []

for epoch in range(epochs):
    avg_tr_loss = 0
    tr_step = 0

    for x_mb, y_mb in tr_dataset:
        with tf.GradientTape() as tape:
            tr_loss = loss_fn(model, x=x_mb, y=y_mb)
        grads = tape.gradient(target=tr_loss, sources=model.variables)
        opt.apply_gradients(grads_and_vars=zip(grads, model.variables))
        avg_tr_loss += tr_loss
        tr_step += 1
    else:
        avg_tr_loss /= tr_step
        tr_loss_hist.append(avg_tr_loss)

    if (epoch + 1) % 5 ==0:
        print('epoch : {:3}, tr_loss : {:.3f}'.format(epoch + 1, avg_tr_loss.numpy()))
모델을 학습합니다. 주요 부분만 보자면, loss함수를 계산후, apply_gradient를 이용하여 gradient를 계산합니다.
결과를 확인해보면,
yhat = model.predict(x_data)
yhat = np.argmax(yhat, axis=-1)
print('acc : {:.2%}'.format(np.mean(yhat == y_data)))
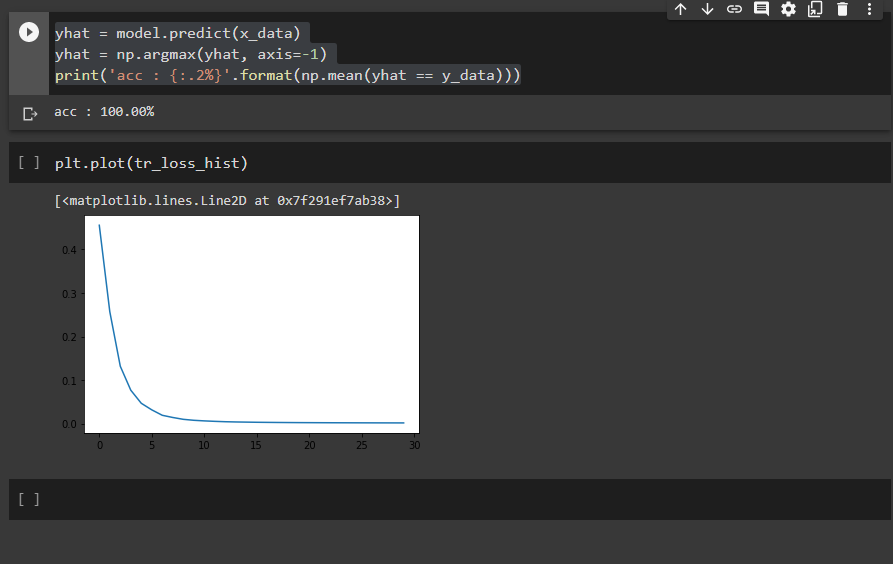
accuracy는 100%이고, epoch가 실행될때마다 loss가 줄어드는 것을 확인할 수 있네요.
RNN기본과 many to one만 알아보았어요. 어떠셨나요? 조금은 감이 오시나요?? 사실 저같은 경우에는 알긴 알겠는데 아직 정확히 머리에 삘이 꽂히지는 않네요 ㅠㅠ 애매한 부분은 같이 토론해보아요~
그럼 20000~
* 모두를 위한 딥러닝 시즌2 - Tensorflow강의를 참고하였습니다.
'AI' 카테고리의 다른 글
| [ai-2team] 2. Multi-variable linear regression, Logistic regression, Softmax Classifier (0) | 2021.01.15 |
|---|---|
| [AI-3Team] 소프트맥스 회귀(Softmax Regression) 다중 클래스 분류 (0) | 2021.01.13 |
| [ai-2team]1. Linear Regression, minimize cost (0) | 2021.01.07 |
| [ai-1team] 5. Convolutional Neural Network (0) | 2021.01.01 |
| [AI-3Team] 다변수 선형 회기(Multi Variable Linear Regression) (0) | 2020.12.29 |


